Effective Exercises for Inner Thighs: Strengthen and Tone

Strong inner thighs not only contribute to an aesthetically pleasing physique but also play a crucial role in overall leg strength and stability. Whether you’re looking to tone up for aesthetic reasons, enhance athletic performance, or improve your overall leg strength, incorporating targeted exercises into your fitness routine can help you achieve your goals. Here are some effective exercises for inner thighs specifically designed to strengthen and tone this often-overlooked muscle group.

1. Sumo Squats

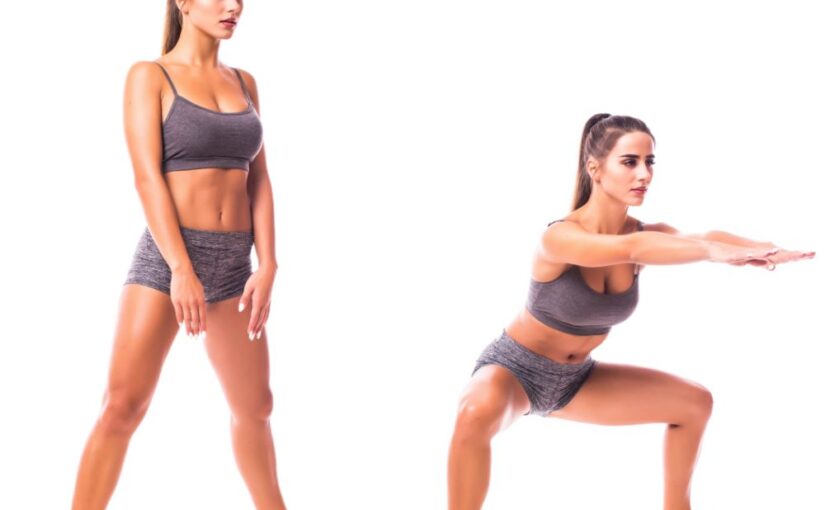
Sumo squats are a variation of traditional squats that specifically target the inner thighs while also engaging the glutes and quadriceps.

How to Do It:

  • Stand with your feet wider than shoulder width apart and toes pointing slightly outward.
  • Lower your body into a squat, maintaining your back straight and your knees parallel with your toes.
  • Push through your heels to return to the initial position.
  • Perform 10-15 repetitions for 2-3 sets.

2. Inner Thigh Leg Raises

This exercise isolates the inner thigh muscles, providing an effective way to strengthen them without requiring any equipment.

How to Do It:

  • Lie on your side, legs placed on top of one another.
  • Bend the top leg and place that foot in front of the bottom leg for stability.
  • Raise the bottom leg towards the ceiling, keeping it straight and engaged.
  • Lower it back down without touching the floor. Repeat for 10-15 repetitions, then switch sides.

3. Side Lunges

Side lunges work not only the inner thighs but also the outer thighs, glutes, and quads, making them a comprehensive lower body exercise.

How to Do It:

  • Stand with your feet hip-width apart.
  • Take a big step to the right, bending the right knee while keeping the left leg straight.
  • Push back to the starting position and repeat on the left side.
  • Perform 10-15 reps per side for 2-3 sets.

4. Pilates Side Leg Lifts

Pilates is known for its focus on core strength and flexibility, and side leg lifts are excellent for targeting the inner thighs.

How to Do It:

  • Lie on your side, legs extended straight and stacked.
  • Lift the top leg slightly and then lower it to about a 45-degree angle, keeping the movement slow and controlled.
  • Lower the leg back to the starting position without touching the bottom leg. Repeat for 10-15 repetitions, then switch sides.

5. Bridge with a Ball

Using a stability ball adds an extra challenge to the traditional bridge exercise, targeting the inner thighs effectively.

How to Do It:

  • Lie on your back with your feet resting on a stability ball, knees bent.
  • Squeeze the ball with your knees while lifting your hips to the ceiling.
  • Sustain for a moment at the top, then lower back down. Repeat for 10-15 repetitions.

6. Clamshells

Clamshells primarily target the glutes but also engage the inner thighs, making them a great addition to your workout routine.

How to Do It:

  • Lie on your side with your knees bent at a 90-degree angle and feet together.
  • Keep your feet together and lift your upper knee as high as you can without shifting your pelvis.
  • Lower the knee back down to the starting position. Perform 10-15 repetitions, then switch sides.

7. Wall Sit with a Ball

This exercise challenges your inner thighs while also improving your endurance and stability.

How to Do It:

  • Standing with your back against a wall, place a small ball or cushion between your knees.
  • Slide down the wall into a squat position, making sure your knees stay behind your toes.
  • Squeeze the ball with your knees and hold for 30-60 seconds.

Effective Exercises for Inner Thighs: Comparison Overview

ExercisePrimary FocusEquipment NeededDifficultyBonus Benefits
Sumo SquatsInner thighs, glutesNoneModerateAlso targets quads
Inner Thigh Leg RaisesInner thighsNoneBeginnerGreat for isolation work
Side LungesInner & outer thighsNoneModerateBuilds balance & coordination
Pilates Side Leg LiftsInner thighs, coreNoneModerateImproves core control
Bridge with a BallInner thighs, glutesStability ballModerateEnhances hip and core strength
ClamshellsGlutes, inner thighsNone/resistance bandBeginnerImproves hip stability
Wall Sit with a BallInner thighsSmall ball/cushionModerateBuilds muscular endurance

Tips for Success

  • Warm Up: Always begin with a warm-up to prepare your muscles and reduce the chance of injury.
  • Focus on Form: Maintain proper form throughout each exercise to maximize effectiveness and prevent injury.
  • Stay Consistent: Aim to incorporate these exercises into your routine 2-3 times a week for optimal results.
  • Listen to Your Body: If you experience pain (not to be confused with discomfort), stop and assess your form or consult a professional.

Conclusion

Incorporating these effective exercises for inner thighs into your fitness regimen can help you build strength, tone muscles, and support overall leg stability. Whether you’re looking to improve athletic performance, enhance your overall leg strength, or achieve a more toned appearance, consistency is key. Remember to combine these exercises with a balanced diet and cardiovascular activity for the best results. Happy exercising!


Frequently Asked Questions (FAQ)

What Are the Most Effective Exercises for Inner Thighs?

Some of the most effective exercises for inner thighs include sumo squats, inner thigh leg raises, side lunges, Pilates side leg lifts, and bridges with a ball. These moves target and strengthen the adductor muscles responsible for inner thigh tone and stability.

How Often Should I Do Inner Thigh Exercises for Results?

For noticeable results, aim to perform inner thigh exercises 2–3 times per week. Consistency, along with proper form and progressive overload, is key to building strength and definition.

Do Inner Thigh Exercises Help Reduce Fat in That Area?

While inner thigh exercises strengthen and tone the muscles, they don’t directly burn fat in one area. Combine them with cardio and a balanced diet to help reduce overall body fat and enhance muscle definition.

Can I Do These Exercises at Home Without Equipment?

Yes! Most effective exercises for inner thighs—like leg raises, clamshells, and sumo squats—require little to no equipment, making them perfect for home workouts.

Are These Exercises Suitable for Beginners?

Absolutely. Many inner thigh exercises are beginner-friendly. Start with bodyweight movements like inner thigh leg raises or wall sits, and progress to more challenging variations as you build strength.

7 Effective Exercises to Help Alleviate Sciatica Pain

Sciatica, characterized by pain that radiates along the path of the sciatic nerve, can be debilitating. It typically arises from a herniated disc, spinal stenosis, or other conditions that compress the nerve. While rest can sometimes provide temporary relief, engaging in the right sciatica exercises is essential for long-term recovery and pain management. Here, we’ll explore some of the best exercises to alleviate sciatica pain, strengthen supporting muscles, and improve overall spinal health.

1. Piriformis Stretch

The piriformis muscle is deep in the buttock and can occasionally irritate the sciatic nerve when tight. Stretching this muscle can help relieve pressure.

How to Do It:

  • Lie on your back with both knees bent.
  • Cross the affected leg over the opposite knee.
  • Gently raise the uncrossed leg to your chest until you feel a stretch in your buttocks.
  • Hold for 20-30 seconds and switch sides.

2. Knee to Chest Stretch

This stretch helps relieve tension in the lower back and promotes flexibility in the hips.

How to Do It:

  • Lie on your back with both legs extended.
  • Pull one knee to your chest and hold it with both hands.
  • Keep the opposite leg straight and pressed into the floor.
  • Hold for 20-30 seconds, then switch legs.

3. Seated Spinal Twist

This exercise enhances spinal mobility and helps release tension in the lower back.

How to Do It:

  • Sit on the floor with your legs extended.
  • Bend one knee and place your foot against the outside of the opposing thigh.
  • Twist your torso towards the bent knee, using your arm to deepen the stretch.
  • Hold for 20-30 seconds, then switch sides.

4. Cat-Cow Stretch

A dynamic stretch that increases spinal flexibility and relieves back tension.

How to Do It:

  • Begin on all fours, with wrists under shoulders and knees beneath hips.
  • Inhale while arching your back (cow pose), raising your head and tailbone.
  • Exhale as you round your spine (cat position), tucking your chin and tailbone.
  • Repeat for 5-10 cycles.

5. Child’s Pose

A restorative pose that stretches the spine, hips, and thighs, is great for relaxing and relieving back discomfort..

How to Do It:

  • Begin on all fours and then sit back on your heels.
  • Reach your arms forward on the floor, lowering your forehead to the ground.
  • Sustain for 30 seconds to 1 minute, breathing deeply.

6. Bridges

Strengthening the glutes and lower back can help support the spine and alleviate sciatica symptoms.

How to Do It:

  • Lie on your back with knees bent and feet flat on the ground, spaced hip-width apart.
  • Push through your heels to lift your hips towards the ceiling, contracting your glutes at the top.
  • Sustain for a few seconds, then lower back down. Repeat 10-15 times.

7. Walking

While it may seem simple, regular walking can improve circulation, reduce inflammation, and strengthen the muscles that support your back.

How to Do It:

  • Aim for at least 20-30 minutes of walking a few times a week. Start at a comfortable pace and gradually increase your duration and intensity.

Sciatica Exercises Overview

Exercise NamePrimary BenefitTarget AreaDuration/Reps
Piriformis StretchRelieves nerve compressionButtocks20–30 sec/side
Knee-to-Chest StretchEases lower back tensionLower back, hips20–30 sec/leg
Seated Spinal TwistImproves spinal mobilitySpine, lower back20–30 sec/side
Cat-Cow StretchIncreases flexibilitySpine, core5–10 cycles
Child’s PoseRelaxes spine, reduces stressSpine, hips, thighs30–60 sec
BridgesStrengthens glutes/lower backGlutes, hamstrings10–15 reps
WalkingBoosts circulation, mobilityFull body20–30 mins

Tips for Success

  • Listen to Your Body: Always consult with a healthcare professional before starting any new exercise program, especially if you’re experiencing severe pain.
  • Stay Consistent: Regular practice of these exercises can lead to gradual improvements.
  • Combine with Other Therapies: Consider physical therapy, chiropractic care, or acupuncture for a holistic approach to managing sciatica.

Conclusion

While sciatica can be painful and frustrating, incorporating these exercises into your routine can help alleviate discomfort and strengthen the muscles that support your spine. Always remember to approach your sciatica exercises gently and consult with a professional if your symptoms persist. With dedication and care, you can find relief and improve your quality of life.


Frequently Asked Questions (FAQ)

Which Sciatica Exercises Are Most Effective for Relieving Pain?

Effective sciatica exercises for pain relief include the piriformis stretch, knee-to-chest stretch, and bridges. These exercises focus on the muscles surrounding the sciatic nerve, helping to relieve tension and ease discomfort.

How Often Should I Do Sciatica Exercises?

For optimal results, try to do sciatica exercises 3 to 5 times per week. Start with gentle stretches and progress gradually as your pain decreases. Be mindful of your body’s signals and seek advice from a healthcare professional if necessary.

Can Sciatica Exercises Help With Long-term Recovery?

Yes, incorporating sciatica exercises into your routine can promote long-term recovery by strengthening muscles that support the spine and improving flexibility, thus reducing the risk of future flare-ups.

Can Walking Help Alleviate Sciatica Pain?

Yes, walking is a simple but effective way to relieve sciatica pain. It enhances circulation, strengthens the supporting muscles of the spine, and aids in reducing inflammation around the sciatic nerve. Aim for 20-30 minutes of walking several times a week.

Should I Consult a Doctor Before Starting Sciatica Exercises?

It’s recommended to consult a healthcare professional before starting new sciatica exercises, particularly if you’re experiencing severe pain or have existing health conditions. They can provide personalized guidance and ensure you’re following a safe routine.

Exploring the Benefits of Front Squats

Front squats are an effective lower-body exercise that also engages the core and upper body. Unlike traditional back squats, the barbell is positioned in front of the body, which changes the mechanics of the lift and provides a unique set of benefits. Let’s explore the benefits of front squats and why incorporating them into your routine can elevate your workout.

1. Enhances Quadriceps Development

One of the primary benefits of front squats is their emphasis on the quadriceps.

  • Muscle Activation: With the barbell positioned in front, there is increased knee flexion during the squat, leading to greater activation of the quadriceps compared to back squats.
  • Leg Strength: Stronger quads contribute to improved performance in various activities, from running to jumping.

2. Improves Core Strength and Stability

Front squats require significant core engagement to maintain proper form and balance.

  • Core Activation: The upright position of the torso during a front squat demands a strong core to stabilize the spine, enhancing overall core strength.
  • Posture Improvement: This emphasis on core stability can translate to better posture in everyday activities and other exercises.

3. Promotes Better Form and Technique

The front squat encourages proper squat mechanics, making it an excellent choice for lifters of all levels.

  • Upright Torso Position: The positioning of the barbell helps keep the torso more upright, reducing the risk of forward lean and promoting proper squatting form.
  • Technique Focus: Beginners can benefit from the front squat as it emphasizes technique, which can carry over to other lifts.

4. Reduces Strain on the Lower Back

Front squats can be a safer alternative for individuals who may experience discomfort during back squats.

  • Spinal Alignment: The more vertical torso position reduces the shear force on the lower back, making it easier on the spine.
  • Lower Back Protection: This can be particularly beneficial for those with existing back issues or those looking to prevent injury.

5. Increases Functional Strength

The front squat mimics real-life movements, making it a functional exercise that enhances overall strength and performance.

  • Everyday Activities: The mechanics of the front squat translate well to everyday tasks that require lifting, such as picking up heavy objects.
  • Athletic Performance: Improved strength and stability from front squats can enhance performance in sports that require lower body strength and explosive movements.

6. Boosts Flexibility

Front squats require and promote flexibility in several areas, including the hips, ankles, and wrists.

  • Hip Flexibility: The squat position encourages deeper hip flexion, helping to improve overall hip mobility.
  • Ankle Mobility: The need for proper ankle flexion during the squat can enhance ankle mobility, which is beneficial for various physical activities.

7. Versatile and Adaptable

Front squats can be easily modified to suit different fitness levels and goals.

  • Variations: You can perform front squats with a barbell, dumbbells, or even kettlebells, allowing for flexibility in your training.
  • Progressions: Beginners can start with lighter weights or bodyweight to master the movement before progressing to heavier loads.

8. Time-Efficient Exercise

Incorporating front squats into your routine can yield significant benefits in a relatively short amount of time.

  • Full-Body Engagement: Since front squats engage multiple muscle groups, you can achieve a comprehensive workout that builds strength and endurance efficiently.
  • Quick Workouts: They can be included in high-intensity interval training (HIIT) or circuit workouts, making them a time-efficient choice for those with busy schedules.

Conclusion

Front squats are a powerful exercise that offers a variety of benefits, from enhanced quadriceps development to improved core strength and functional fitness. Whether you’re a beginner or an experienced lifter, incorporating front squats into your workout routine can lead to significant gains in strength, stability, and mobility. As with any exercise, focus on proper form to maximize the benefits and minimize the risk of injury. So grab a barbell and give front squats a try—you may find them to be a valuable addition to your training program!


Frequently Asked Questions (FAQ)

Are Front Squats Better Than Back Squats?

It depends on your goals. Front squats place more emphasis on the quads and core, while back squats engage the posterior chain more. Front squats are also easier on the lower back and encourage better posture, making them ideal for improving form and mobility.

What Muscles Do Front Squats Work?

This exercise targets the quadriceps, glutes, and core. It also calls into play the upper back and shoulders to stabilize the barbell, offering a full-body challenge.

Are Front Squats Good for Beginners?

Yes, front squats can be great for beginners when taught with proper form and light weight. They help build foundational strength and promote proper squat mechanics.

How Often Should I Do Front Squats?

One to two times per weeks is ideal for most people. This allows enough frequency to build strength and improve form without overtraining the legs and core.

What Equipment Do I Need for Front Squats?

A barbell is the most common tool for front squats, but you can also use dumbbells, kettlebells, or a sandbag. A squat rack and lifting shoes are helpful for stability and safety.

Recommended Equipment for Front Squats

Training at home doesn’t mean compromising on effectiveness. With the right accessories, you can safely and efficiently perform front squats and build total-body strength.


Barbell Set

A quality barbell and weight plate set allows for progressive overload, making it essential for effective front squatting and full-body strength training.


Squat Rack

A sturdy squat rack helps you position the bar safely for front squats and offers added features like pull-up bars or safety arms for solo training.


Dumbbells

Dumbbells are versatile and great for learning front squat form, offering an easier way to build strength before progressing to barbells.


Kettlebells

Kettlebells are ideal for goblet squats or front rack variations, promoting core engagement and balance while building lower-body strength.


Fitness Sandbags

Sandbags challenge your grip, core, and coordination—great for front squat variations that mimic real-world movement and build stability.


Affiliate Disclaimer: The links above are affiliate links. If you purchase through them, we may earn a small commission at no extra cost to you.

Top Benefits of Romanian Deadlifts for Building Strength

The Romanian deadlift (RDL) is a well-known movement that focuses on strengthening the posterior chain, particularly the hamstrings, glutes, and lower back. Known for its effectiveness in building strength, enhancing athletic performance, and supporting overall fitness, the RDL is a staple in many training programs. Both beginners and experienced lifters can benefit from its versatility and impact. In this article, we’ll explore the key benefits of Romanian deadlifts and why you should consider adding them to your routine.

1. Strengthens the Posterior Chain

The RDL is particularly effective for developing the muscles along the back of your body.

  • Hamstrings: The exercise places significant emphasis on the hamstrings, promoting strength and hypertrophy.
  • Glutes: Engaging the glutes helps in building a powerful and well-defined backside.
  • Lower Back: The RDL strengthens the lower back muscles, which are crucial for maintaining proper posture and preventing injury.

Muscles Worked by Romanian Deadlifts

Muscle GroupRole During ExercisePrimary or Secondary
HamstringsHip extension, eccentric controlPrimary
GlutesHip extension, stabilizationPrimary
Lower BackSpinal stability, posture supportPrimary
CoreTrunk stabilizationSecondary
Forearms/GripHolding the weightSecondary
CalvesAnkle and knee stabilizationSecondary

2. Improves Hip Hinge Mechanics

The Romanian deadlift teaches and reinforces proper hip hinge mechanics, which are fundamental to many athletic movements and exercises.

  • Functional Movement: Mastering the hip hinge can enhance performance in activities such as running, jumping, and lifting.
  • Posture and Form: Improved hip hinge mechanics contribute to better overall posture, reducing the risk of back injuries.

3. Increases Flexibility

Performing Romanian deadlifts can help improve flexibility in the hamstrings and hip joints.

  • Hamstring Stretch: As you lower the weights, you’ll feel a deep stretch in your hamstrings, promoting greater flexibility over time.
  • Hip Mobility: Regularly incorporating RDLs can enhance hip mobility, which is beneficial for various sports and daily activities.

4. Enhances Athletic Performance

The strength and stability gained from Romanian deadlifts can translate to improved performance in other sports and physical activities.

  • Power Generation: Stronger hamstrings and glutes can enhance your ability to generate power, benefiting activities like sprinting and jumping.
  • Injury Prevention: Strengthening the posterior chain helps protect against common injuries, particularly in the knees and lower back.

5. Supports Core Stability

While the RDL primarily targets the lower body, it also engages the core muscles, promoting stability and strength in the midsection.

  • Core Engagement: Maintaining proper form during the lift requires a strong and engaged core, which can lead to better overall core strength.
  • Balance and Stability: A strong core contributes to improved balance, essential for both athletic performance and everyday activities.

6. Versatile and Adaptable

The Romanian deadlift is a versatile exercise that can be adapted to suit different fitness levels and goals.

  • Variations: You can perform RDLs with various equipment, including dumbbells, kettlebells, or a barbell, allowing for flexibility in your training routine.
  • Modifications: Beginners can start with lighter weights or bodyweight to master the form before progressing to heavier loads.

7. Convenient for Home Workouts

The Romanian deadlift can be performed with minimal equipment, making it suitable for home workouts.

  • Space-Efficient: You don’t need a large gym or extensive equipment to incorporate RDLs into your routine.
  • Time-Saving: The exercise can be performed quickly and efficiently, making it ideal for those with busy schedules.

Conclusion

The benefits of Romanian deadlifts are far-reaching—from building a stronger posterior chain to enhancing flexibility and athletic performance—making them a staple in strength training programs. Whether you’re a seasoned lifter or a beginner, adding RDLs to your routine can boost overall fitness and support your strength goals. As with any exercise, proper form is essential to maximize results and reduce injury risk. So grab some weights and give Romanian deadlifts a try—you may find they’re exactly what your training has been missing.


Frequently Asked Questions (FAQ)

Have questions about form, equipment, or how to get the most out of the benefits of Romanian deadlifts? Below are answers to the most common questions to help you train smarter and safer.

What is the Difference Between Romanian Deadlifts and Conventional Deadlifts?

Romanian deadlifts (RDLs) start from a standing position and emphasize the eccentric (lowering) phase with a slight knee bend, focusing more on the hamstrings and glutes. Conventional deadlifts start from the floor and engage more total-body strength, including the quads.

Are Romanian Deadlifts Good for Beginners?

Yes! RDLs are beginner-friendly when performed with light weights and proper form. They’re excellent for learning the hip hinge movement and building foundational posterior chain strength.

How Often Should I Do Romanian Deadlifts?

You can include RDLs in your routine 1–2 times per week, depending on your training split. Be sure to allow recovery between sessions, especially if you’re also doing other lower-body work.

What Equipment Do I Need for Romanian Deadlifts?

This exercise can be performed with a barbell, dumbbells, kettlebells, or resistance bands. A flat surface and good footwear are also recommended for balance and form.

Do Romanian Deadlifts Help With Flexibility?

Yes. Romanian deadlifts provide a dynamic stretch for the hamstrings and hips, promoting better flexibility and mobility when performed consistently with proper range of motion.

Recommended Equipment for Romanian Deadlifts

If you’re looking to unlock the full benefits of Romanian deadlifts at home or improve your gym setup, these versatile accessories can help you train more efficiently and safely. Each option supports proper form, progression, and variety.


Barbell Set

A quality barbell set is ideal for Romanian deadlifts, allowing you to increase weight over time and build serious strength. Look for a bar with good grip knurling and sturdy plates.


Dumbbells

Dumbbells offer great control and flexibility, making them excellent for learning the Romanian deadlift movement pattern. They’re also ideal for unilateral variations.


Kettlebells

Kettlebells are a space-efficient way to perform Romanian deadlifts and many other hip-hinge movements. They’re especially good for high-rep sets and dynamic workouts.


Resistance Bands

Resistance bands are useful for priming the posterior chain before deadlifting or adding light tension to the movement itself. They’re also excellent for recovery work.


Affiliate Disclaimer
The above links are affiliate links. If you purchase through these links, we may earn a small commission at no additional cost to you.

Exploring the Benefits of Bulgarian Split Squats

The Bulgarian split squat is a powerful and effective exercise that targets multiple muscle groups, making it a favorite among fitness enthusiasts and athletes. This unilateral movement not only enhances strength and stability but also offers a variety of other benefits. Here’s a closer look at why you should consider adding Bulgarian split squats to your workout routine.

1. Strengthens Lower Body Muscles

The Bulgarian split squat primarily targets the quadriceps, hamstrings, and glutes. By isolating each leg, this exercise helps build strength in the lower body more effectively than traditional squats.

  • Quadriceps: The front of your thighs is heavily engaged as you push through the heel of your front foot.
  • Hamstrings and Glutes: The back leg plays a crucial role, especially during the lowering phase, which helps in developing the posterior chain.

Muscle Groups Targeted by Bulgarian Split Squats

Muscle GroupRole During ExerciseNotes
QuadricepsPrimary moverMain focus of front leg
GlutesHip extension, stabilizationStrong activation in both legs
HamstringsAssist in movementEspecially active during descent
CalvesStabilizationHelps maintain balance
CoreStabilizationEngaged to prevent tipping forward

2. Improves Balance and Stability

Performing Bulgarian split squats requires a significant amount of balance and coordination. As you lower and raise your body, your core and stabilizing muscles engage to maintain proper posture and control.

  • Core Activation: The core muscles work hard to stabilize your body, improving overall balance.
  • Ankle Stability: The movement also strengthens the muscles around the ankle joint, contributing to better stability.

3. Enhances Flexibility

This exercise promotes flexibility in the hips and legs. The deep range of motion required in Bulgarian split squats helps stretch and lengthen the hip flexors, which can become tight from prolonged sitting.

  • Hip Flexors: A deeper squat position can help alleviate tightness in these muscles, improving mobility.
  • Leg Muscles: The full range of motion enhances flexibility in both the front and back of the legs.

4. Corrects Muscle Imbalances

Since Bulgarian split squats are performed one leg at a time, they are particularly effective for identifying and correcting muscle imbalances between the legs. This can be especially beneficial for both athletes and individuals recovering from injuries.

  • Unilateral Training: Focusing on one leg helps ensure that each side of the body develops equally, reducing the risk of injury.
  • Rehabilitation: This exercise can aid in recovery by strengthening the weaker leg without overloading it.

5. Boosts Athletic Performance

The Bulgarian split squat translates well to improved athletic performance. Strengthening the legs and enhancing balance can lead to better results in sports that require explosive movements, such as running, jumping, and climbing.

  • Power Generation: The strength gained from this exercise can improve your ability to generate power in other movements.
  • Agility and Coordination: Enhanced stability and balance contribute to overall athletic agility.

6. Can Be Modified for All Fitness Levels

The Bulgarian split squat is highly adaptable, making it suitable for individuals at any fitness level. You can adjust the difficulty by changing the height of the back leg, adding weights, or altering the tempo of the movement.

  • Beginner-Friendly: Start without weights or with your body weight to master the form.
  • Advanced Variations: Add dumbbells, a barbell, or perform the exercise on an unstable surface to increase the challenge.

7. Convenient and Space-Efficient

One of the practical benefits of Bulgarian split squats is that they can be performed almost anywhere, requiring minimal space and no equipment. All you need is a chair, bench, or any elevated surface.

  • Home Workouts: Perfect for home exercise routines where space is limited.
  • Travel-Friendly: Great for hotel gyms or outdoor workouts since it doesn’t require special equipment.

Conclusion

The Bulgarian split squat is a versatile and effective exercise that offers numerous benefits for overall fitness and performance. From building lower body strength and improving balance to enhancing flexibility and correcting muscle imbalances, it is a fantastic addition to any workout routine. Whether you are a beginner or an experienced athlete, incorporating Bulgarian split squats can help you achieve your fitness goals. So grab a bench and give it a try—you might just find it to be a game-changer in your training!


Frequently Asked Questions (FAQ)

What Muscles Do Bulgarian Split Squats Work?

This exercise targets the quadriceps, gluteal muscles, and hamstrings. They also call into action the core and calves for balance and stabilization.

Are Bulgarian Split Squats Better Than Regular Squats?

Not necessarily better—just different. Bulgarian split squats are great for isolating each leg, correcting muscle imbalances, and improving balance and mobility, while regular squats are better for overall max strength.

Can Beginners Do Bulgarian Split Squats?

Yes! Beginners can start with bodyweight only and use a lower surface for the back leg. Prioritize correct technique and stability before adding resistance.

How High Should the Rear Foot Be Elevated?

Typically for most people, a standard bench height of 12″ – 18″ works. The rear foot should rest comfortably without creating strain in the lower back or front knee.

How Many Times a Week Should I Perform Bulgarian Split Squats?

As part of a lower-body or leg-focused workout, 2–3 times per week is ideal, especially Allow time for muscle recovery between sessions.

Recommended Equipment for Bulgarian Split Squats

Enhance your training experience with versatile, space-conscious gear that supports strength, balance, and proper form—whether you’re at home or in the gym.

Adjustable Dumbbells

These dumbbells are perfect for gradually increasing weight in Bulgarian split squats and save space compared to traditional dumbbell sets.


Adjustable Weight Bench

An adjustable bench allows for optimal positioning and comfort during Bulgarian split squats. It’s also a staple for many other strength exercises.


Resistance Bands

Use resistance bands to activate muscles, increase flexibility, or make bodyweight movements more challenging—perfect for travel or small spaces.


Power Cage

A power cage provides full support for barbell-based Bulgarian split squats and other compound lifts. With safety bars and pull-up options, it’s a comprehensive training station.


Affiliate Disclaimer
The links above are affiliate links. This means that if you make a purchase through these links, we may earn a small commission at no extra cost to you.

Effective Exercises to Boost Energy at Your Standing Desk

Standing desks have grown in popularity as a way to promote better posture, reduce the risks associated with prolonged sitting, and increase energy levels throughout the workday. To maximize the benefits of a standing desk, incorporating specific exercises can help improve circulation, enhance focus, and reduce muscle tension. Here are some effective exercises you can do at your standing desk.

1. Standing Calf Raises

How to do it:

  • Stand with your feet hip-width apart.
  • Slowly raise your heels off the floor, balancing on your toes.
  • Hold for a moment, then lower back down.

Benefits: Strengthens calf muscles and improves circulation in your legs.

Frequency: Strive for 10-15 repetitions, 2-3 times throughout the day.

2. Desk Push-Ups

How to do it:

  • Place your hands on the edge of your desk, spaced shoulder-width apart.
  • Put your feet back so that your body forms a straight line.
  • Lower your chest toward the desk, then push back to the starting position.

Benefits: Strengthens your arms, chest, and core while enhancing upper body stability.

Frequency: Perform 10-15 repetitions, 2-3 times a day.

3. Standing Side Leg Lifts

How to do it:

  • Stand straight and hold onto your desk for balance.
  • Raise one leg straight out to the side.
  • Lower it back down without touching the ground.

Benefits: Strengthens hip muscles and improves balance.

Frequency: Aim for 10-15 repetitions on each leg, a few times during the day.

4. Neck and Shoulder Stretches

How to do it:

  • Stand up straight and gently tilt your head to one side, bringing your ear toward your shoulder.
  • Hold for 15-30 seconds, then switch sides.
  • For shoulder stretches, roll your shoulders forward and backward in circular motions.

Benefits: Reduces strain in the neck and shoulders, which promotes improved posture.

Frequency: Repeat each stretch 2-3 times on each side, especially if you feel tightness.

5. Standing Torso Twist

How to do it:

  • Stand with your feet shoulder-width apart.
  • Place your hands on your hips or stretch them out to the sides.
  • Gently twist your torso to the right while looking over your shoulder.
  • Hold for 15-30 seconds, then switch sides.

Benefits: Improves spinal mobility and reduces stiffness.

Frequency: Perform 2-3 repetitions on each side every couple of hours.

6. Ankle Circles

How to do it:

  • Stand on one leg, using your desk for support if needed.
  • Lift the other foot slightly off the ground and make circular motions with your ankle.
  • Switch directions after several circles, then switch legs.

Benefits: Increases ankle flexibility and reduces the risk of stiffness.

Frequency: Do 5-10 circles in each direction for both ankles, a few times a day.

7. Marching in Place

How to do it:

  • Stand tall and march in place, raising your knees high.
  • Swing your arms to engage your upper body.

Benefits: Increases heart rate and improves circulation without requiring much space.

Frequency: March for 1-2 minutes every hour or whenever you need a quick energy boost.

8. Standing Squats

How to do it:

  • Stand with your feet shoulder-width apart.
  • Lower yourself as if sitting back in a chair, keeping your chest up and your knees behind your toes.
  • Rise back up to standing.

Benefits: Strengthens your legs and glutes while promoting better posture.

Frequency: Aim for 10-15 repetitions, 2-3 times throughout the day.

Standing Desk Exercise Comparison

ExerciseTarget AreaPrimary BenefitFrequency
Standing Calf RaisesCalves, Lower LegsBoosts circulation2–3x/day, 10–15 reps
Desk Push-UpsArms, Chest, CoreBuilds upper body strength2–3x/day, 10–15 reps
Standing Torso TwistSpine, CoreImproves mobility, reduces tensionEvery few hours
Ankle CirclesAnkles, Lower LegsEnhances flexibilityA few times/day
Marching in PlaceFull BodyIncreases heart rate, energy1–2 mins/hour

Conclusion

Incorporating exercises into your routine at a standing desk can significantly enhance your physical well-being and productivity. These simple movements help improve circulation, strengthen muscles, and relieve tension, making your workday more active and enjoyable. Aim to integrate these exercises regularly, and listen to your body’s needs. By staying active at your desk, you can promote better health and maintain energy throughout the day!


Frequently Asked Questions (FAQ)

Are Standing Desk Exercises Effective?

Yes, standing desk exercises can improve posture, circulation, and energy levels. When performed on a consistent basis, they help combat the negative effects of prolonged sitting or standing.

How Often Should I Do Standing Desk Exercises During the Day?

Aim to perform a few exercises every hour or incorporate short movement sessions 2–3 times per day. Consistency is more important than intensity.

Can I Do These Exercises in a Small Workspace?

Absolutely. Most standing desk exercises, such as calf raises, shoulder rolls, or torso twists, require little to no space and can be done right at your workstation.

Do Standing Desk Exercises Replace Regular Workouts?

No, they complement a regular fitness routine. These exercises keep you active during work hours but should not fully replace dedicated cardio or strength training.

What’s the Best Standing Desk Exercise to Start With?

Standing calf raises or marching in place are great beginner-friendly options. They’re easy to do, require no equipment, and get your blood flowing quickly.

Helpful Gear to Support Standing Desk Exercises

If you’re looking to enhance your movement throughout the workday, these products can complement your standing desk routine:

Standing Desk
A standing desk with adjustable height lets you alternate between sitting and standing effortlessly, helping to ease physical strain and support better posture during your workday.

Balance Ball Chair
This type of chair encourages better posture and activates your core muscles while seated, making it a great addition to an active workspace.

Under Desk Elliptical
Compact and quiet, an under desk elliptical lets you engage in gentle cardio even while working, helping improve circulation and energy.


Affiliate Disclaimer:
The links above are affiliate links. This means that if you click through and make a purchase, we may earn a small commission at no extra cost to you.

Effective Desk Exercises for Better Health at Work

In the modern workplace, it’s common for people to spend extended periods seated at their desks. This sedentary lifestyle can lead to various health issues, including poor posture, back pain, and decreased energy levels. However, incorporating simple desk exercises into your workday can help counteract these effects, boost productivity, and improve overall well-being. Here are some effective desk exercises, along with their benefits and recommended frequency.

1. Seated Leg Raises

This simple exercise helps strengthen your legs and improve circulation.

How to do it:

  • Sit up straight in your chair.
  • Extend one leg straight out in front of you, holding it for a few seconds.
  • Lower it back down without letting your foot touch the floor.
  • Benefits: Strengthens leg muscles and promotes blood flow.
  • Frequency: Aim for 10-15 repetitions on each leg, a few times a day.

2. Desk Push-Ups

A great way to strengthen your upper body, desk push-ups can be done using your desk as support.

How to do it:

  • Stand a few feet away from your desk.
  • Place your hands on the desk’s edge, shoulder-width apart.
  • Lower your chest towards the desk while keeping your body straight.
  • Push back to the starting position.
  • Benefits: Strengthens arms, chest, and core muscles.
  • Frequency: Aim for 10-15 repetitions, 2-3 times during your workday.

3. Neck Stretches

Sitting at a desk can lead to tension in your neck. Regular stretches can alleviate this discomfort.

How to do it:

  • Sit up straight and drop your right ear towards your right shoulder.
  • Sustain for about 15-30 seconds, feeling the stretch on the left side of your neck.
  • Switch sides and repeat.
  • Benefits: Reduces neck stiffness and improves flexibility.
  • Frequency: Perform 2-3 times on each side, ideally every hour.

4. Shoulder Rolls

Shoulder rolls are a great way to relieve stress and improve posture.

How to do it:

  • Either stand or sit with your arms relaxed by your sides.
  • Roll your shoulders forward in a circular motion, 10 times.
  • Then, roll them backward for another 10 repetitions.
  • Benefits: Relieves shoulder tension and promotes better posture.
  • Frequency: Do this every hour or whenever you feel tension building.

5. Seated Torso Twist

This exercise helps stretch your spine and improve flexibility.

How to do it:

  • Sit up straight in your chair.
  • Twist your torso to the right while looking over your shoulder and placing your right hand on the back of your chair.
  • Hold for 15-30 seconds, then switch sides.
  • Benefits: Improves spinal mobility and alleviates lower back tension.
  • Frequency: Repeat 2-3 times on each side, ideally every couple of hours.

6. Standing Calf Raises

Stand up for a quick workout that targets your calf muscles.

How to do it:

  • Stand up behind your chair, holding onto the back for support.
  • Using your toes to balance, raise your heels off the ground.
  • Lower back down slowly.
  • Benefits: Strengthens calf muscles and improves circulation.
  • Frequency: Aim for 10-15 repetitions, 2-3 times a day.

7. Wrist and Finger Stretches

Long periods of typing can lead to stiffness in your hands and wrists.

How to do it:

  • Put one arm out in front of you, palm facing up.
  • Use the opposite hand to gently pull back on your fingers.
  • Hold for 15-30 seconds, then switch hands.
  • Benefits: Reduces stiffness and prevents repetitive strain injuries.
  • Frequency: Perform this stretch 2-3 times on each side, especially after long typing sessions.

8. Mini Workouts

Consider incorporating short bursts of exercise during breaks. Set a timer for every hour to remind you to get up and move.

Examples include:

  • Quick walks around your office.
  • Climbing stairs if available.
  • Doing jumping jacks or high knees for a minute.
  • Benefits: Boosts energy levels, enhances mood, and improves overall productivity.
  • Frequency: Take a 5-minute movement break every hour.

Desk Exercises Quick Guide

ExerciseTarget AreaKey BenefitsFrequency
Seated Leg RaisesLegs, CirculationStrengthens legs, improves blood flow10–15 reps per leg, 2–3x/day
Desk Push-UpsArms, Chest, CoreBuilds upper body strength10–15 reps, 2–3x/day
Neck StretchesNeckReduces stiffness, improves flexibilityEvery hour
Shoulder RollsShoulders, Upper BackEases tension, improves postureEvery hour
Seated Torso TwistSpine, Lower BackEnhances mobility, relieves back tension2–3x per side, 2x/day
Standing Calf RaisesCalvesBoosts circulation, strengthens calves10–15 reps, 2–3x/day
Wrist/Finger StretchesHands, WristsPrevents strain, improves flexibilityAfter typing sessions
Mini WorkoutsFull BodyBoosts energy, breaks up sedentary time5 min every hour

Conclusion

Incorporating desk exercises into your daily routine is a simple yet effective way to combat the negative effects of prolonged sitting. These exercises can help improve circulation, reduce muscle tension, and increase your overall energy levels. Aim to integrate these movements into your workday regularly, listening to your body and adjusting as needed. Staying active, even at your desk, can lead to a healthier and more productive workday!


Frequently Asked Questions (FAQ)

Why Are Desk Exercises Important?

Desk exercises help counteract the negative effects of prolonged sitting, such as poor posture, muscle stiffness, and reduced circulation.

How Often Should I Do Desk Exercises During the Workday?

Aim for short exercises every hour. Even 5–10 minutes of movement can improve energy, focus, and physical comfort.

Do I Need Special Equipment for Desk Exercises?

No, most desk exercises use only your body weight and can be done using your chair or desk as support.

Can Desk Exercises Really Improve Posture?

Yes. Movements like shoulder rolls, neck stretches, and torso twists help relieve tension and reinforce good posture habits.

Are Desk Exercises Effective for Stress Relief?

Absolutely. Light movement throughout the day increases endorphins, reduces muscle tension, and helps clear mental fatigue.

Helpful Gear to Support Desk Exercises

If you’re looking to enhance your workstation and support a more active work routine, here are a few helpful accessories that can complement your desk exercises:

Standing Desks
Adjustable standing desks allow you to alternate between sitting and standing throughout the day, promoting better posture and reducing sedentary time.

Balance Ball Chairs
These ergonomic alternatives to traditional chairs engage your core muscles and encourage better spinal alignment while you work.

Under-Desk Ellipticals
Compact and easy to use, under-desk ellipticals let you keep your legs moving and circulation flowing while staying focused on work.


Affiliate Disclaimer

The links above are affiliate links, which means we may earn a small commission if you make a purchase through them, at no additional cost to you.

Cardio Workouts You Can Do with a Sprained Ankle

Sustaining a sprained ankle can be frustrating, but incorporating cardio exercises into your routine may actually assist in your recovery. Engaging in low-impact cardio can help maintain circulation, support overall fitness, and promote healing without putting undue stress on your injury. Here are some effective cardio options to consider during your recovery.

1. Seated Cardio Exercises

Seated workouts are a great way to elevate your heart rate while keeping your ankle stable. Try these:

  • Seated Marching: Lift your knees alternately as if marching in place. This engages your core and keeps your heart rate up.
  • Arm Circles: Extend your arms to the sides and make small circles to maintain an elevated heart rate while seated.

2. Swimming

Swimming provides a full-body workout with minimal impact on your ankle. The buoyancy of water reduces stress on the joints, making it an ideal choice for cardio during recovery. Focus on upper body strokes or use a kickboard to keep your injured foot elevated.

Benefits:

  • Enhances cardiovascular fitness while promoting muscle healing.
  • Improves circulation, which can aid recovery.

3. Stationary Biking

Using a stationary bike allows you to engage in cardio without putting weight on your ankle. Adjust the seat height for comfort and pedal with a smooth motion. This low-impact exercise can help maintain your cardiovascular fitness and support blood flow to the injured area.

Tips:

  • Start with low resistance and gradually increase it.
  • Monitor your ankle for any discomfort while biking.

4. Chair Aerobics

Chair aerobics can keep you active while seated. Look for routines that include upper body movements and gentle leg exercises.

Sample Movements:

  • Seated side leg lifts (if comfortable).
  • Upper body punches while seated to elevate your heart rate.

5. Light Dance or Movement

If you feel comfortable, try gentle dancing or movement that keeps your feet close to the ground. Focus on upper body movements while minimizing weight on your ankle.

Examples:

  • Gentle swaying or arm movements to music.
  • Seated or standing upper body dances, ensuring your feet stay stable.

Low-Impact Cardio Options for a Sprained Ankle

ExerciseImpact LevelEquipment Ankle UseBeginner-Friendly
Seated MarchingVery LowChairNoneYes
Arm CirclesNoneNoneNoneYes
SwimmingVery LowPoolMinimal (modifiable)Yes
Stationary BikingLowStationary BikeLightYes
Chair AerobicsLowChairOptionalYes
Light Dance (seated or upper body)Very Low to LowNoneMinimalYes

6. Consult a Physical Therapist

If you’re uncertain about which cardio exercises are safe during your recovery, consulting a physical therapist can be invaluable. They can provide tailored recommendations to help you stay active while ensuring your ankle heals properly.

Conclusion

Incorporating cardio exercises into your routine while recovering from a sprained ankle can promote circulation and overall fitness, potentially aiding in a faster recovery. Focus on seated workouts, swimming, and stationary biking to maintain your cardiovascular health without risking further injury. Always listen to your body, and consult a healthcare professional before starting any new exercise regimen. With the right approach, you can support your healing process while staying active.


Frequently Asked Questions (FAQ)

Can I Do Cardio With a Sprained Ankle?

Yes, you can! Low-impact cardio exercises such as seated workouts, swimming, or stationary biking allow you to stay active without putting strain on your ankle.

What is the Safest Form of Cardio After a Sprained Ankle?

Seated exercises and swimming are among the safest options. They elevate your heart rate while minimizing or eliminating pressure on your injured ankle.

When Can I Start Cardio After Spraining My Ankle?

Start light cardio once the swelling and pain have reduced—usually a few days to a week after injury. Always check with your healthcare provider or physical therapist before returning to any form of physical activity.

Can Stationary Biking Help With Ankle Recovery?

Yes. Stationary biking promotes circulation and can help maintain joint mobility with minimal impact, making it a good addition to a sprained ankle cardio routine.

Are There Cardio Exercises Where the Legs Aren’t Involved?

Absolutely. Arm-focused movements like seated punches or arm circles, as well as shadow boxing from a chair, can get your heart rate up without engaging the legs.

Home Cardio Workouts That Get Results

Cardiovascular exercise, commonly known as cardio, is essential for maintaining heart health, improving endurance, and burning calories. Fortunately, you do not need a gym membership or costly equipment to enjoy effective home cardio workouts. Here are some exercises you can do at home, regardless of your fitness level.

1. Jump Rope

Jumping rope is a great exercise to get your heart pumping. It improves coordination, burns calories, and can be easily adapted to your fitness level. It’s one of the most efficient home cardio workouts—portable, scalable, and fun. Start with intervals: jump for 30 seconds, rest for 30 seconds, and gradually increase the duration as you build endurance.

Tips:

  • Choose a rope that suits your height.
  • Concentrate on landing softly on the balls of your feet.

2. High-Intensity Interval Training (HIIT)

HIIT workouts consist of alternating between short bursts of intense exercise with brief recovery periods. This method is efficient for burning calories in a short amount of time. A simple HIIT routine could include exercises like burpees, mountain climbers, and jumping jacks.

Sample Routine:

  • 30 seconds of burpees
  • 30 seconds of rest
  • 30 seconds of mountain climbers
  • 30 seconds of rest
  • Repeat for 15-20 minutes.

3. Bodyweight Exercises

Bodyweight exercises are great for building strength and boosting your heart rate. Incorporate movements such as:

  • Jump Squats: Squat down and jump up explosively, landing softly.
  • Lunges: Perform alternating forward lunges or jump lunges for added intensity.
  • Push-ups: Standard, incline, or decline push-ups elevate your heart rate.

These can be combined to create varied home cardio workouts that also enhance muscular endurance.

4. Dancing

Put on your favorite music and dance! Dancing is not only fun, but also a terrific way to raise your heart rate. You can follow online dance workouts or simply freestyle in your living room.

Benefits:

  • Improves coordination and balance.
  • Reduces stress and boosts mood.

5. Stair Climbing

If you have stairs at home, use them to get your cardio fix. You can walk, run, or even do lunges up and down the stairs. For an added challenge, try running up the stairs and walking down for recovery.

Safety Tip: Ensure that the stairs are clear of obstacles to prevent falls.

6. Shadow Boxing

Shadow boxing is an excellent way to improve cardiovascular fitness while also building strength and agility. Throw punches in the air, incorporate footwork, and keep moving for an effective workout.

Routine:

  • Warm up for 5 minutes (light jogging or jumping jacks).
  • 3 minutes of shadow boxing, focusing on speed and technique.
  • 1-minute rest; repeat for 20-30 minutes.

7. Online Workouts

With the rise of fitness apps and YouTube channels, there are countless free home cardio workouts available. From dance cardio to kickboxing, find a style that you enjoy and follow along at home.

Recommendation: Look for beginner-friendly sessions if you’re just starting out.

8. Walking or Jogging in Place

If you prefer a low-impact option, simply walking or jogging in place can be effective. To increase intensity, lift your knees higher or incorporate arm movements.

Duration: Aim for at least 30 minutes, gradually increasing the pace.

Comparison Table of Home Cardio Workouts

WorkoutIntensityEquipment NeededBeginner-FriendlyCalories Burned (est. per 15 min)
Jump RopeHighYes (rope)Yes200–250
HIITHighNoModerate180–220
Bodyweight ExercisesMedium–HighNoYes130–180
DancingMediumNoYes120–150
Stair ClimbingHighStairsModerate180–200
Shadow BoxingMedium–HighNoYes150–200
Online WorkoutsVariesOptionalYesVaries
Jogging in PlaceLow–MediumNoYes100–130

Conclusion

Incorporating cardio into your home routine is not only possible but can also be enjoyable and varied. Whether you prefer high-intensity training or low-impact movement, there are plenty of home cardio workouts to suit your needs. The key is to stay consistent and choose exercises you enjoy. Don’t forget to warm up before and cool down after to help prevent injury. With these options, you can maintain heart health and fitness—all from the comfort of home.


Frequently Asked Questions (FAQ)

What Are the Best Home Cardio Workouts for Beginners?

Great beginner-friendly options include walking in place, dancing, and bodyweight exercises like squats and lunges. These require no equipment and are easy to modify based on your fitness level.

How Often Should I Do Home Cardio Workouts?

Aim for at least 3–5 sessions per week, each lasting 20–30 minutes. Consistency is key to improving cardiovascular health and endurance.

Can I Lose Weight With Home Cardio Workouts?

Yes! Home cardio workouts help burn calories and improve metabolism. When combined with a healthy diet, they can support effective and sustainable weight loss.

Do I Need Equipment for Cardio at Home?

Most home cardio workouts don’t require equipment. However, a jump rope, mat, or stairs can add variety and intensity if desired.

Are Short Workouts Still Effective?

Absolutely. Even 10–15 minute sessions can be effective if done with moderate to high intensity. HIIT workouts are especially efficient in short timeframes.

The Benefits of Jump Rope: A Helpful Overview

Jumping rope is an exercise that transcends age and fitness levels, offering an effective and enjoyable way to improve health and fitness. Whether you remember it from childhood or are new to the activity, the benefits of jump rope are numerous and powerful. This workout provides various health benefits, including cardiovascular improvement, increased strength, and better coordination. Here’s a closer look at why you should consider incorporating jump rope into your fitness routine.

1. Full-Body Workout

Jumping rope is a dynamic exercise that engages multiple muscle groups. As you jump, you’re working your legs, arms, core, and shoulders. This full-body engagement not only helps improve muscle tone but also contributes to overall strength, making jump rope an efficient workout option. The benefits of jump rope go beyond calorie burn to encompass muscle building and conditioning.

2. Cardiovascular Health

One of the standout benefits of jump rope is its ability to boost cardiovascular fitness. As a high-intensity aerobic exercise, it elevates your heart rate, improving circulation and lung capacity. Regularly incorporating jump rope into your workouts can lead to better endurance, stamina, and overall heart health.

3. Effective Calorie Burn

Jumping rope is a highly effective way to burn calories. Depending on your weight and the intensity of your workout, you can burn a significant number of calories in just 10 to 15 minutes. This makes it an excellent choice for weight loss or maintenance, allowing you to achieve your fitness goals more quickly.

Chart: Jump Rope vs. Other Cardio Workouts

WorkoutCalories Burned (15 min)Muscle Groups WorkedCardio IntensityPortable
Jump Rope200–250Full Body (legs, core, arms)High
Running180–220Legs, CoreHigh
Cycling150–200Legs, CoreMedium–High
Jumping Jacks100–120Full BodyMedium

4. Improved Coordination and Agility

The rhythmic nature of jumping rope requires coordination and timing. As you practice, you’ll improve your hand-eye coordination and agility, skills that are beneficial not only in sports but also in everyday activities. Enhanced agility can contribute to better performance in various physical endeavors.

5. Bone Health

Jumping rope is a weight-bearing exercise, which helps strengthen bones and improve bone density. This is particularly important for preventing osteoporosis, especially as you age. Regularly engaging in jump rope workouts can contribute to long-term bone health and resilience.

6. Portable and Convenient

One of the great perks of jumping rope is its portability. A jump rope is lightweight, easy to store, and can be taken anywhere. Whether you’re at home, at the gym, or traveling, you can easily fit in a jump rope workout, making it a convenient addition to your fitness routine.

7. Mental Focus and Stress Relief

Jumping rope requires concentration and rhythm, which can enhance your mental focus. The repetitive nature of the exercise can also serve as a form of stress relief, allowing you to clear your mind and focus on the moment. The endorphin release from physical activity can further boost your mood and reduce anxiety.

8. Versatility and Variety

Jump rope workouts can be tailored to suit any fitness level. Whether you’re a beginner or an advanced athlete, you can modify your routine with different techniques, such as single-leg jumps, double unders, or crisscrosses. This variety keeps your workouts interesting and helps prevent boredom.

Warm-Up and Cool-Down Benefits

Jumping rope is an excellent option for both warm-ups and cool-downs. As a warm-up, it helps elevate your heart rate, increase blood flow to your muscles, and prepare your body for more intense exercise. Aim for about 5 to 10 minutes of jump rope as a warm-up.

As a cool-down, jumping rope can help your body gradually return to a resting state while still providing some light cardiovascular activity. Just a few minutes of slow-paced jumping can aid in recovery.

How to Jump Rope Correctly

To maximize the benefits of jumping rope and minimize the risk of injury, follow these tips for proper form:

  1. Choose the Right Rope: Select a rope that is the correct length for your height. When you step in the center of the rope, the handles should reach your armpits..
  2. Proper Grip: Hold the handles with a relaxed grip and keep your elbows close to your body.
  3. Jumping Technique: Use your wrists to turn the rope and keep your jumps low—just a few inches off the ground. To reduce impact, land softly on the ball of your feet.
  4. Breathing: Maintain a steady breathing pattern throughout your workout to help sustain your energy levels.

Final Thoughts

Jumping rope is a versatile and effective exercise that offers a wide range of benefits, from improved cardiovascular health to enhanced coordination and mental focus. Whether you’re looking to lose weight, boost your fitness, or simply add some fun to your workouts, jumping rope is a fantastic option. Aim for about 10-15 minutes of jumping to maximize calorie burn and cardiovascular benefits. Grab a rope, start jumping, and experience the many advantages this simple exercise has to offer!


Frequently Asked Questions (FAQ)

What’s an Effective Daily Jump Rope Duration?

Begin with 10 to 15 minutes per session, performed 3 to 5 times weekly. As your stamina improves, increase duration or intensity to boost cardiovascular and fat-burning benefits.

Can Jump Rope Help With Weight Loss?

Yes! A major benefit of jump rope is its efficiency in burning calories. Just 15 minutes can burn up to 250 calories, supporting fat loss when combined with a healthy diet.

Is Jump Rope Safe for Beginners?

Absolutely. Beginners can start with slow, single jumps and short intervals. It’s affordable, simple to master, and adaptable to all fitness levels.

What Muscles Does Jumping Rope Work?

Jumping rope works multiple muscle groups, such as your lower legs, thighs, buttocks, abdominal area, shoulders, and arms. It’s a true full-body workout that strengthens and tones multiple muscle groups.

Can Jumping Rope Improve Balance and Coordination?

Yes, definitely. Jump rope is particularly effective for enhancing coordination, rhythm, and footwork. It enhances neuromuscular control and body awareness.

Jump Rope Options for Every Fitness Level

If you’re looking to incorporate jump rope into your fitness routine, there are several types of jump ropes to choose from, each offering unique benefits. Below is a quick guide to assist you in deciding which type is best for you:

Standard Jump Ropes

Basic jump ropes are the most common and versatile type. They are ideal for beginners and can be used for basic jumping techniques. Whether you’re looking to improve cardiovascular health or simply have fun, a regular jump rope is a great option. Look for adjustable ropes to customize the length based on your height.

Speed Jump Ropes

Speed jump ropes are designed specifically for quick, high-intensity workouts. With lightweight handles and a fast-rotating cord, they are perfect for people who want to improve their agility, endurance, and speed. These ropes are commonly used in sports training and CrossFit workouts, where fast-paced jumping is essential.

Weighted Jump Ropes

If you’re looking to intensify your workout, weighted jump ropes are an excellent choice. The added weight in the handles helps to build upper body strength while still providing the cardiovascular benefits of regular jump rope exercises. These ropes are great for those looking to challenge themselves and add a strength component to their jump rope routine.

Beaded Jump Ropes

Beaded jump ropes are often used for freestyle jumping and performing tricks. The beads give the rope extra weight, making it easier to control and allowing you to perform complex patterns with more precision. These ropes are also a fun option for children or anyone looking to add a little creativity to their jump rope workout.


Affiliate Disclaimer

The links above are affiliate links, which means we may earn a small commission if you make a purchase through them at no extra cost to you.